Introduction
Mood boards help people to get a bit of inspiration, explore, and outline their ideas and dreams, present their ideas, creative visions, and dreams to others, and move from a raw draft to a plan of action.
The process of creating a mood board has evolved during the last decade. Now, you can avoid going over dozens of magazines to find the needed pieces. There's nothing between you and your idea's visual representation with xTiles.
Let's start doing it together step-by-step. In the end, you will have a mood board that is appealing, stylish, and perfectly represents your ideas and feelings.
What is a mood board?
Sometimes words are not enough to express our ideas, so we keep them to ourselves until they fade. Sometimes we're too scared to present our thoughts to others, so we choose to stay silent. A mood board is your tool for speaking out loud what can't be outlined in words.
Traditionally, a mood board is a collage of different images linked together by the same idea or purpose, mostly using glue.
The concept of a mood board was significantly modified by Pinterest. Now it looks like an activity we can easily manage without disrupting our usual routine, just for fun, to plan our outfits, find ideas for interior designs, nail designs, etc. The truth is that for many creative professionals, mood boards are part of their working process.
We believe that mood board creation is a strong organizational skill. You can't put anything you want indiscriminately because the result will be total gibberish with no purpose and no representational potential.
You must clearly define what you want and what you need to see before you start. Mood boards are also about self-discipline because it takes a lot of effort to stick to your initial purpose when you can't find the needed element for a long time.
Digital mood board benefits
People are transitioning from classical mood boards to those on their smartphones or laptops for many reasons.
- The amount of trash we produce is terrifying, and if it's possible to save at least one tree branch, why not? Surely, you can recycle everything later, but giving up on using something is always the best strategy for saving the environment.
- You can take your mood board anywhere you want if it's online. You can have as many of them as you want. And you're free to share them with anyone on the internet.
- Also, we believe that it's a nice addition that you won't have a callus on your hand after using scissors.
- You're not limited to using only pictures you like (also, imagine how hard it is to find physical objects you like that would suit the initial concept). You may also add audio and video content if that is what inspires you or presents your idea.
- A mood board template is much more than a blank canvas. It's a flexible space with many design features and opportunities ready to express any of your ideas. It's much easier than some popular design tools like Adobe Express because there's no need to learn new tricks to use it.
- You don't have to have any graphic design skills to create your own mood boards with ready-to-use templates and online tools.
When do I need a mood board?
Mood boards serve many purposes. People create them for their design projects, fashion design projects, interior design projects, etc. People create them to develop their overall style, save time on brainstorming, get inspiration when things become tough, develop concepts to the fullest, etc.
Most mood boards not only express the creative vision of their creator but also help others to get the needed vibe and stay on the same page while they are working together.
Their application would be limited only by your ideas and, sometimes, courage. However, we would like to talk a little more about when you may benefit from creating and using a mood board so that you can understand the whole idea better.
1. To start your project
The beginning is always the hardest part of whatever you do, especially if you're not sure what exactly you want to do or reach. Creating a mood board is like conducting research in this case. While you're looking for the needed material and information, when choosing between different options, you get an understanding of what the whole thing is supposed to be about.
2. To map out your idea or project
A journey from when the idea arose until the final design may take weeks or months, like an interior design project. No wonder sometimes people can't understand why their final product is nothing similar to what they planned. It's easy to miss the initial idea among many tasks if it isn't clearly defined.
By creating a mood board at the beginning, you establish a strong foundation and get a reminder for later. Whenever you're hesitant about whether everything goes according to plan, just go to your mood board and see for yourself.
3. To make cooperation within a team and the onboarding process easier
Even members of a well-coordinated and harmonious team might struggle to understand each other. If you use the right tools, your team will get stronger after each disagreement. A mood board will help you express your idea visually, leaving minimum space for verbal explanation. That is especially helpful for teams with members from different countries and with different mother tongues.
4. To make communication with your client easier
To explain something to a client might be even harder than to newcomers. If you have worked in the marketing industry or have been a freelancer, you probably already know that retrieving the information that will help you do your job might be challenging. The xTiles Brief Template will help you obtain needed information quickly and get it structured.
However, that still might not be enough. You may create a mood board and present it to your client before you start simply to check whether you're both on the same page.
5. To get inspiration
And, last but not least – visual inspiration. You need it not only to start but also to keep going if things become tough. However, the situation is a bit more complicated yet beneficial. By creating mood boards, if conducted well, you also organize your inspiration. You tame a raw, sometimes chaotic, force that might lead you astray. Allowing you to set the needed direction, an inspiration board gives you the ability to get the maximum out of what inspires you.
How to create a mood board?
As you can see, mood boards are handy for different reasons and help with different issues. However, there are certain steps you need to take in order to get a board that will work on so many levels.
We have already prepared a ready-to-use mood board template and our example of a mood board to make your creative process easier and save your project from resulting in wasted time.
Now, we want to provide you with detailed instructions. We promise the whole process won't take you much time (besides, you've already saved it because there's no need to go over piles of magazines and play with scissors and glue).
In the end, you will have the most powerful, visually appealing, and inspirational mood board ever. Let's make a mood board in four easy steps and also enjoy the design process, too.
1. Define for what purpose you need your mood board
This step is more complicated than it might seem. Besides traditional goals like presenting a project at the office, for fun, getting inspiration, etc., you need to understand whether your mood board is a practical representation of a finished idea or about finding the solution or needed direction.
Remember that mood boards are about learning, exploring, and researching. Something goes wrong if they put you into a frame, limiting your creative freedom.
Now that you know what your mood board should look like, let's start creating it. The step many forget about is giving it a name. That's important if you've decided to create a couple of them or if there will be different versions of one. Also, you may add a few descriptive words to help your audience better understand your creative project.
The next step is writing down all of your ideas for the current board.
2. Compile needed elements that inspire you
The second part is the most enjoyable because you will need to scroll over your favorite apps for an important purpose this time and let your creative juices flowing.
- Use your Pinterest board and saved posts on Instagram to find the needed images and get the visual directions for your creative projects. Please save everything that you consider to be at least a bit useful. That's easier and quicker than checking your browser history later to find that one picture.
- Since this part is mostly about looking for different kinds of content, it might be tiring. You need to keep control over what you're checking so the stream of recommendations won't take you in another visual direction.
- You may also look for other visual elements like video and audio content since mood board templates don't limit you in any way. You're free to use anything you like to express yourself and your ideas.
- For example, if you want your brand to be associated with a certain song or kind of music, add it to your mood board. Let's say you're working on creating a collection of clothes with a 60s vibe. You've already added everything you need to show the needed period of time, but somehow the picture looks flat. The compilation of audio and visual elements allows you to create an incredibly full representation.
If you need a mood board for work, the process will look slightly different because you might not have enough design elements saved somewhere simply because they didn't resonate with you.
- Start by adding all the materials you already have about the company, project, or product to your new board. Add logos, the website if there's one, designs, visual style, brand values, and any other elements of brand identity.
- Only now can we begin to look for what will bring inspiration and help find the needed direction, idea, solution, etc.
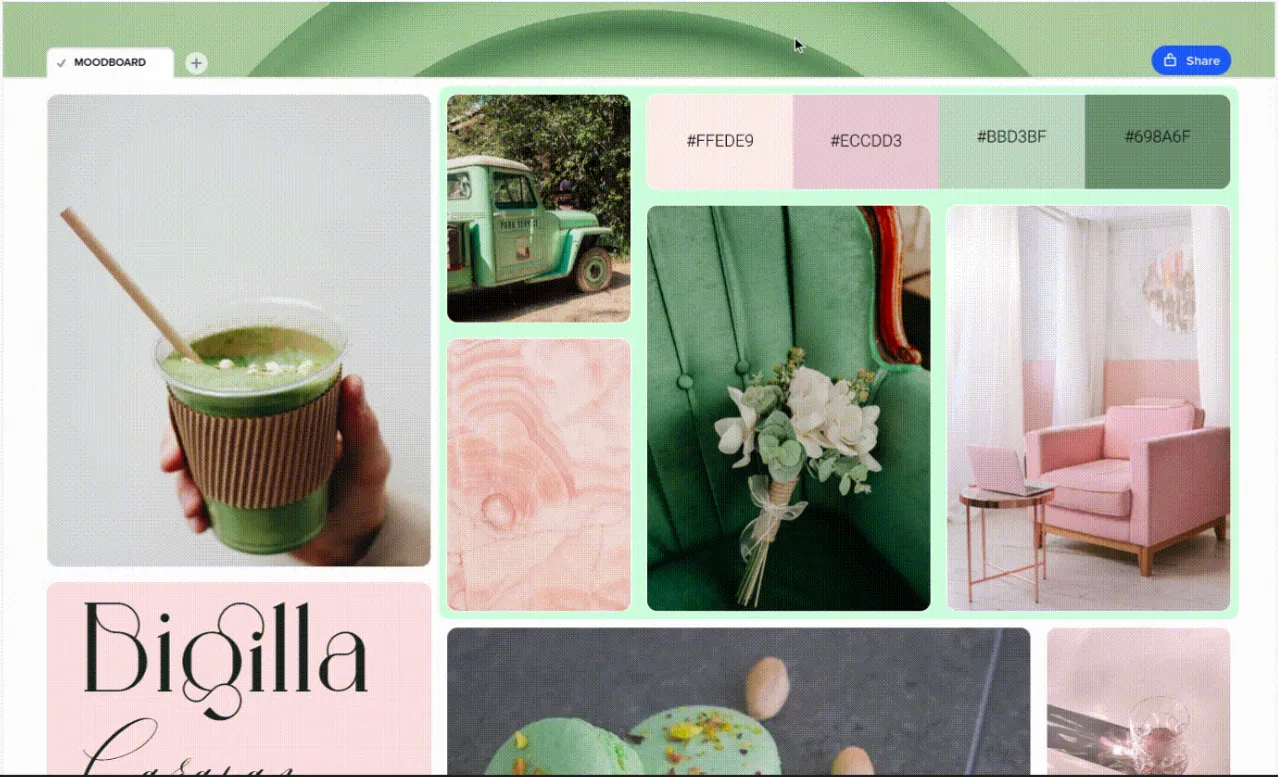
- Also, don't forget to add brand colors and fonts. They are an important part of any brand identity, and putting them on the board will help you understand whether they suit the needed aesthetic.
- If you lack inspiration or are lost somewhere in the process, try to think calmly and choose the images that relate directly to your general idea.
3. Turn them into a cohesive picture
This step might be even more time-consuming than the previous one, especially if the previous one was fruitful and you found a lot of what might be used. You need to thoroughly consider what must be on your board, what might ruin the whole thing, and what might become a final accent.
- Check how the images you choose for your mood board work together and whether they work together at all. However, given your goals, we don't always strive for completeness when creating mood boards.
- Define which elements are key (usually, that's a logo if we talk about work mood boards). They better be placed somewhere easy to see to show their importance. It may be at the top or center.
- However, you're free to put them wherever you want and show their role by applying visual tricks like highlighting, color change, applying various shapes, putting them as the last layer on top of everything, etc. With an easy drag-and-drop option in our template, you can change the placement of your elements whenever you want and how many times you need.
- Try to stick to one color scheme in your mood board. It will give it a consistent look and make it easier to comprehend.
Also, in the end, you will see the bigger part of the content you chose previously remained untouched. That's how it's supposed to be. However, don't hurry to delete them. You still may need them to add a significant piece to complete the picture.
4. Review the result and make refinements if necessary
Finally, you have a first draft. We're almost there.
You may check the notes you made at the beginning to ensure your mood board reflects the idea. They will help to see whether you have moved in the needed direction. That's why we recommend keeping them until the board is finished and reviewed.
If you have time and it wasn't a last-minute project, put the result aside for a day or two before reviewing it and making changes. When it's fresh, it might be hard to see if there's something wrong or what you could make look better.
If it is a mood board for your team's project, you may show it to other team members who know what it is supposed to look like and be about. Other people's opinion is important and may help you find the issues you can't see.
At this stage, you also may prepare a little note or explanation for your team or a client if you're afraid some parts or aspects of your board might be hard to get or controversial.
Summing up
Mood board is a tool that may assist you in many situations. It helps to explore and research, it helps to find links and connections between different ideas, it helps present your ideas visually when words are not enough, it serves you well with different tasks if you're a visual thinker, it helps to start on a project or a dream, it helps you communicate within a team and with your client, and yes, you will have a lot of fun searching for needed images and then combining them.
The best thing about mood boards is that despite all that we described in the previous paragraph, they are super easy to create with our only four steps guide and ready-to-go template.
What is the purpose of a mood board?
A mood board is a visual tool used to explore and outline ideas, present creative visions, and move from initial concepts to actionable plans. It serves as a means to express ideas that are difficult to articulate with words alone.
Why has the process of creating mood boards evolved in recent years?
Advancements in technology have streamlined the process, eliminating the need to search through physical magazines for images. Tools like the xTiles Mood Board Template offer a convenient and efficient way to create visually appealing mood boards.
What are the benefits of creating digital mood boards?
Digital mood boards offer several advantages, including environmental sustainability by reducing paper waste, accessibility across devices for convenience, and the ability to incorporate various multimedia elements like audio and video to enhance creativity.
When is the ideal time to create a mood board?
Mood boards are useful at different stages of a project, from the initial planning phase to collaboration within a team and communication with clients. They can help clarify ideas, develop concepts, and maintain alignment among project stakeholders.
How do I create a successful mood board?
To create an effective mood board, it's essential to define its purpose, compile relevant elements that inspire you, ensure visual cohesion, and review and refine the result as necessary. By following these steps and utilizing tools like the provided mood board template, you can create a powerful and visually appealing mood board tailored to your needs.